How to create a ‘Grab my button’ for your sidebar
 Do you have a button or banner for your blog? You might have more than one – perhaps one for your blog itself and then several others for your popular posts or weekly features such as a linky party. You can add these into your posts and sidebars – but their real value can come from asking others to post the button on their site, thereby advertising your site and drawing in more traffic. These are especially important if you host a linky party – want to get your party started? Then just ask me to add your button to the BIG List of Linky Parties.
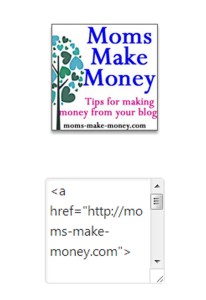
 Have you ever wondered how to produce that little box with the code you can grab to display a button – wonder no more. You can make this easily for yourself. Here’s how.
- You’ll need a button. The standard size is 125 x 125 pixels. But 150 can also work. If designing your own button, design at 250 and then shrink the finished graphic for a more precise look and sharper finish.
- You will need to host the graphic online so it will display on other websites. I suggest using Photobucket but you may already be using an alternative that you like. Upload your button to Photobucket and make note of the direct link provided.
- Set up a widget in your sidebar – both Blogger and WordPress are very similar.
- Blogger -from your dashboard, select Layout, click Add a Gadget, choose HTML.
- WordPress – from your dashboard, select Widgets, then drag a Text/HTML widget to your sidebar where you want your button displayed.
- Within your widget/gadget you will first want to display the button graphic. Use this code and replace DIRECT LINK with the direct link code for your image.
| <center><img src=”DIRECT LINK” width=”125″ /> </center> |
- Now you need some additional code to display the code box underneath.
| <center> <br /> <br /> <textarea cols=”13″ rows=”10″><a href=”YOUR WEBSITE ADDRESS”> <img src=”DIRECT LINK” width=”125″/></a></textarea></center> |
- You can change the size of the code box by changing the textarea columns and rows. Increasing the number gives you a larger box. See what works best for the size of your sidebar.
- My completed code looks like this:
|
<center><img src=”http://i199.photobucket.com/albums/aa287/debycoles2/Blogging%20stuff/ Website%20-%20buttons%20logos%20etc/250-square-banner.jpg” width=”125″ /> </center> <center> <a href=”http://moms-make-money.com”> <img src=”http://i199.photobucket.com/albums/aa287/debycoles2/Blogging%20stuff/ Website%20-%20buttons%20logos%20etc/ 250-square-banner.jpg” width=”125″/></a></textarea> </center>
|
- Save your widget/gadget and you are done. Now view your site and make sure when you copy and paste the code that your button shows up correctly.
- Congratulations – why not ask some of your favorite bloggers in your niche if they would like to exchange sidebar buttons?
This post originally appeared on Sverve, the fab blogging network where brands meet bloggers. Original post.
Authored by: Deby at Moms Make Money


April 24, 2013 @ 12:20 am
Thank you for sharing this over this over at How To Tuesday! I just pinned this one. 🙂
April 24, 2013 @ 2:23 pm
Thanks for the tutorial. I have done this before but recently Blogger deleted part of my code when I just opened the gadget to check something. Now it deletes half the code when I try to re add my button. Makes me a crazy woman. I am book marking your instructions If it ever does let me fix it. Thanks again. Visiting from Wicked Awesome Wed. Blessings!~ Wanda
April 24, 2013 @ 2:27 pm
Thank you so much for sharing this. I have wondered how to do this. Thanks 🙂
April 24, 2013 @ 5:28 pm
I am pinning this. Maybe I need a button if it is not too hard. I started one months ago, but got bogged down.
April 24, 2013 @ 5:36 pm
thanks for this! got you from A Creative Princess link up.
April 24, 2013 @ 6:13 pm
thank you!
April 25, 2013 @ 7:58 am
perfect! hopping on over from Talkin’ About Thursday
April 25, 2013 @ 1:49 pm
Happy Friday.
would be nice if you can link up at my blog.
Have a nice day.
Nan
http://www.blogshe.net
April 25, 2013 @ 3:09 pm
Thanks for the tutorial. I’m visiting today from the Talkin’ about Thursday hop. 🙂
April 26, 2013 @ 8:34 am
Hi! Just visiting from Diana’s party and I really appreciate these directions. I don’t host a party, but it would be fun to have a button anyway!
April 28, 2013 @ 6:26 am
Thanks for the tutorial, now I just have to figure out how to make the actual button 😉
April 28, 2013 @ 7:50 am
Thanks for this! I have my button made and it was working fine, but then just inexplicably stopped working. I’m going to go through your steps to see if I can fix it now. Thanks again!
April 28, 2013 @ 9:01 am
thank you!!! Little Bit
April 28, 2013 @ 4:07 pm
Thanks for this! Your instructions seems really clear and I must try!
April 29, 2013 @ 1:38 am
Thanks so much for this tutorial, I’m just about to pin it :-). I’ll need to figure out how to do it on weebly, but it can’t be that hard
May 1, 2013 @ 11:19 am
very useful, thank you!!!
May 1, 2013 @ 12:51 pm
Thank you for the tutorial! I have been wondering how to do this! Came over from Tuesday’s Treasures.
lovepastatoolbelt.com
May 3, 2013 @ 9:19 am
Thanks for the tutorial! Very helpful. Thank You so much for sharing at A Bouquet of Talent this week! Happy Friday!
Hugs,
Kathy
May 3, 2013 @ 5:53 pm
Great tutorial! Thanks so much for linking up to Give Me The Goods Monday! We love having you party with us and can’t wait to see what goods you bring next week! Jenna @ Rain on a Tin Roof
October 31, 2014 @ 8:54 am
Thanks for this! I used some of the code to insert my link parties into one area on my blog… now to make a button for my sidebar….